Windows Server 2012 R2 introduces a number deep changes to the way that AD FS works, which means that as practitioners, we need to look for solutions to problems in new, unexpected places. For instance, in the old world, if AD FS was completely unresponsive, the first place I would look after AD FS itself would be IIS. In AD FS 2012 R2, IIS doesn’t play a role. Requests are still served by the HTTP.SYS kernel driver but we interact with it using NETSH HTTP, which connects to the driver via the User Mode HTTP Server API. IIS and other familiar components would also interact with this API previously, but they provided a friendlier layer of abstraction between an administrator and the API. Interacting with HTTP.SYS using NETSH HTTP brings a learning curve with it, particularly when it comes to understanding what is and is not controlled here. Also, there is no GUI and the security that HTTP.SYS enforces is stricter than the abstracted layer that IIS has historically opened up. This web server architecture change and other new differences add to the difficulty of tracking down problems when things don’t work as expected, as detailed in this post.
Updating the Service Communications Certificate, Federation Service Name and Identifier
When updating the URL of an AD FS service, the first and most obvious things to change are the Service Communication Certificate, Name and Identifier. These are all changes that are exposed through the AD FS administration console or through Set-ADFSProperties and Set-ADFSCertificate.
Update: 14 January 2015
A couple of weeks ago Adam Lepkowski recommended an improvement to this section with the Set-AdfsSslCertificate cmdlet, which addresses some of the shortcomings I describe below. For coherence, I will leave my bits untouched, and include Adam’s comment here as an improvement that everyone can take advantage of. I think that seeing my clunkier approach actually helps reveal what’s happening under the hood, so I’m not going to change this content, but I will use Adam’s method in future myself.
Adam Lepkowki’s comment/approach:
Adam Lepkowski says:
December 31, 2014 at 7:36 amSSL binding can be added in such way:
– Run Set-AdfsSslCertificate -Thumbprint thumbprint_here
This command will add new entries for ports 443 and 49433 and update existing localhost binding.Unfortunately you still need to remove the old binding manually:
netsh http delete sslcert hostnameport=sts..com:443
netsh http delete sslcert hostnameport=sts..com:49443
Back to the original post…
For simplicity, I’ll show the GUI screens here:

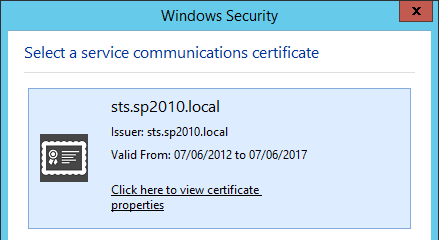
NB: I don’t recommend using .local. This is actually a domain that we’ve moved away from, but for this post it was easiest for me to use these resources.
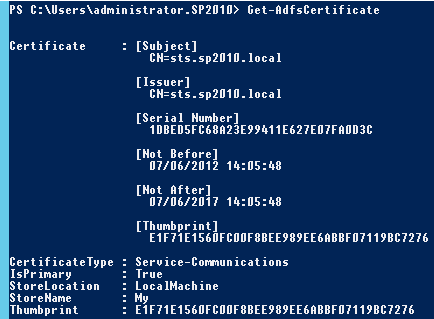
At any rate, these changes work, as they always have done. We can see the changes in Get-ADFSProperties and Get-ADFSCertificate clearly after making them.

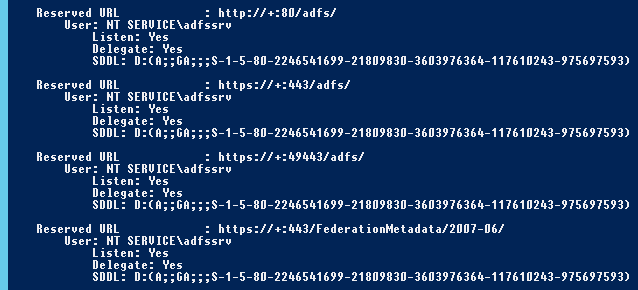
However, as before, we also need to apply these changes to the underlying infrastructure. In the past, this would be a matter of updating the IIS binding, but now we need to invoke the NETSH HTTP commands to interact with HTTP.SYS. The NETSH HTTP SHOW URLACL command unveils listeners, but by default AD FS will reserve a wildcard (+) listener for a port and path, for instance https://+:443/adfs/ or https://+:49443/adfs/, so there isn’t anything to change for the Host Headers (URL reservations).
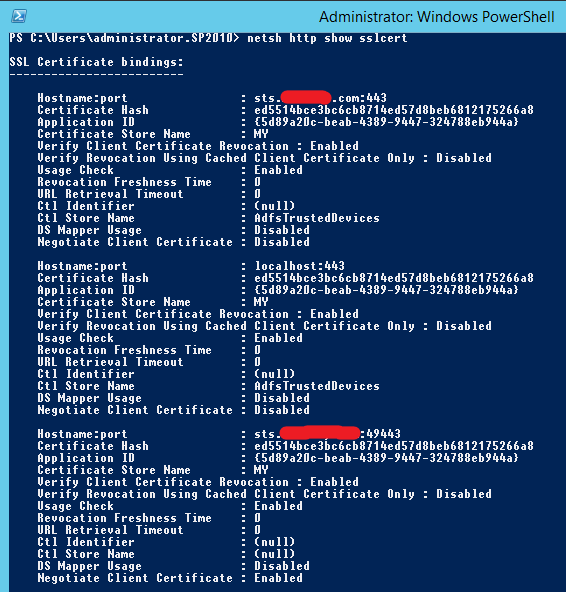
On the other hand, the SSL bindings may need to be updated and they are configured in a much stricter manner than we normally see in IIS (unless we’re using SNI). Indeed, the default HTTP.SYS configuration in Windows Server 2012 R2 assumes the use of TLS extensions like SNI. Using the NETSH HTTP SHOW SSLCERT command I will see that my current configuration still references the SSL bindings for my old SSL certificate and URLs.
Because I’m also updating my certificate at the same time as my URL, all of these bindings need to be updated (to use both the correct certificate and URL). Referencing the old GUID for the Application ID, we can make these changes using NETSH HTTP ADD SSLCERT. Note: due to the way that PowerShell handles the curly braces around the GUID, we need to construct this in a fairly awkward fashion:
$guid = “5d89a20c-beab-4389-9447-324788eb944a”
$certhash = “e1f71e1560fc00f8bee989ee6abbf07119bc7276”
$hostnameport = “sts.sp2010.local:443”
$Command = “http add sslcert hostnameport=$hostnameport certhash=$certhash appid={$guid} certstorename=MY sslctlstorename=AdfsTrustedDevices clientcertnegotiation=disable”
$Command | netsh
This needs to be repeated for the port 49443 binding that’s responsible for Certificate Authentication as well, when that’s required:
$hostnameport = “sts.sp2010.local:49443”
$Command = “http add sslcert hostnameport=$hostnameport certhash=$certhash appid={$guid} certstorename=MY sslctlstorename=AdfsTrustedDevices clientcertnegotiation=enable”
$Command | netsh
And the old bindings need to be manually deleted:
netsh http delete sslcert hostnameport=sts.<oldurl>.com:443
netsh http delete sslcert hostnameport=sts.<oldurl>.com:49443
Although we shouldn’t rely upon the localhost binding, we’ll update that as well, as otherwise it will be secured using the old certificate still. You never know when failing to update this might cause a problem. And you’ll note there is no update command (that I can find), so we need to delete the old binding and create it anew.
netsh http delete sslcert hostnameport=localhost:443
$hostnameport = “localhost:443”
$Command = “http add sslcert hostnameport=$hostnameport certhash=$certhash appid={$guid} certstorename=MY sslctlstorename=AdfsTrustedDevices clientcertnegotiation=disable”
$Command | netsh
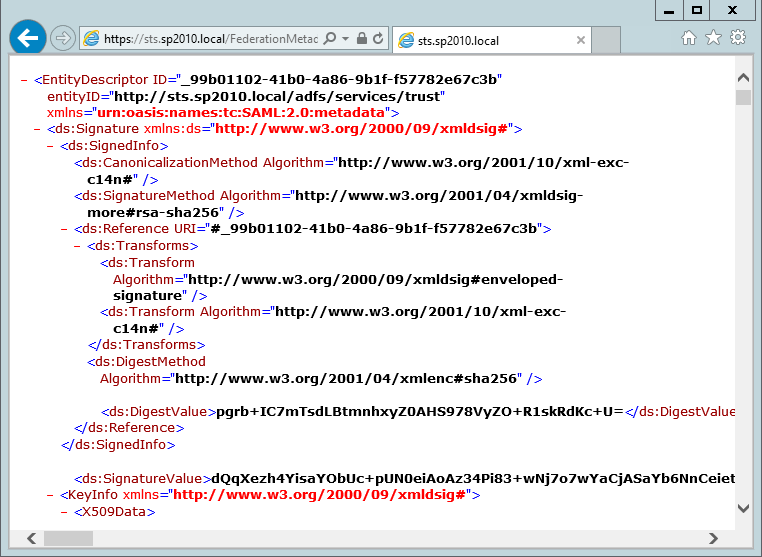
After making these changes it should be possible to successfully browse to the new Federation Metadata URL, as an indicative test that things are working:
This would be a really good time to make sure certificate trusts are in place, all the way up the chain as needed. Things will break later if this isn’t done. And with that, the first changes are done.
Changing Relying Parties to use the new URL
Once we have a responsive Security Token Service on our new URL, we need to update the Relying Parties that AD FS serves. There’s no way I could document all of these, but since this process is surprisingly poorly documented for SharePoint, I’ll detail what it looks like for SharePoint 2010 here. Before running this, it’s important to understand that updating the .Name value will break user profiles so I generally recommend against this. You need to live with the old Name and DisplayName, which may be confusing, but the alternative means migrating all user accounts and updating all Authentication Providers, which will be disruptive in a production environment. Making this update to the SPTrustedIdentityTokenIssuer requires use of the Get and Set cmdlets to make the change in full.
#Note: The ProviderUri parameter in the Get cmdlet equates to the SignInUrl in the Set cmdlet.
$TrustedIdentityTokenIssuer = Get-SPTrustedIdentityTokenIssuer
Set-SPTrustedIdentityTokenIssuer $TrustedIdentityTokenIssuer -SignInUrl “https://sts.sp2010.local/adfs/ls/”
$TrustedIdentityTokenIssuer.Update()
Note: this process is dramatically better than the alternative approach of deleting and re-creating the SPTrustedIdentityTokenIssuer, as that will break any User Profile Synchronisation Connections that depend on it. Avoid!
After making these changes, we should have a totally updated AD FS. But what if we’ve published AD FS and Relying Parties outside the corporate network using the Web Application Proxy? If so, our work is not finished yet.
Updating Web Application Proxies to use the new URL
Before I plunge in too deeply, I have to mention that I’m not sure which of these steps (if any), will be needed if the Web Application Proxy is deployed for the first time after the changes above have been made. My gut feel is that none of them will be necessary, but for reasons that will become clearer soon, I can’t speak to that scenario with any clarity right now.
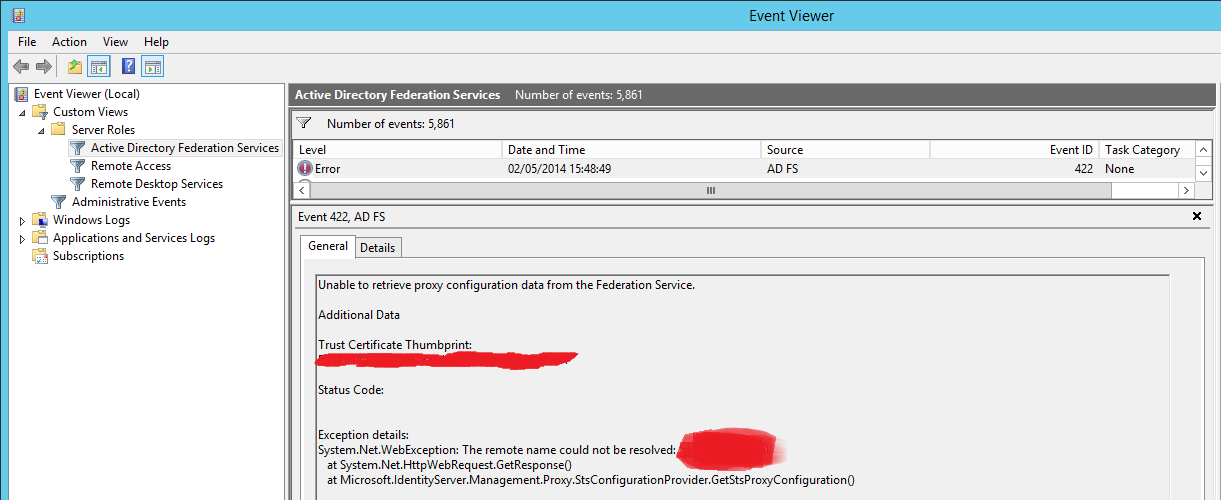
At this point, it’s worth recapping where we are. Presently, the Web Application Proxy has lost its relationship with AD FS, because The AD FS URL has changed and the Web Application Proxy is continuing to request the old URL to update its configuration data (AD FS holds all of the Web Application Proxy configuration information). These requests will fail routinely and they will be logged in the AD FS logs on the Web Application Proxy server(s):
The Web Application Proxy has a method for updating the Federation Service URL that it proxies. The Install-WebApplicationProxy cmdlet can be used to make changes to the certificate that it uses to publish AD FS or the internal and external URLs. In the case that I’ve been stepping through here, the update looks like this:
$FSCredential = Get-Credential
Install-WebApplicationProxy -CertificateThumbprint e1f71e1560fc00f8bee989ee6abbf07119bc7276 -FederationServiceName sts.sp2010.local -FederationServiceTrustCredential $FSCredential
Unfortunately, this change was insufficient to successfully proxy any of the Web Applications that had been reverse-proxied by this server. I did successfully re-establish communication with AD FS, and my old published applications were all visible in the Web Application Proxy administration console, but I couldn’t access anything from outside the network except for AD FS itself (via the Federation Metadata URL, as described above). All of my Relying Parties redirected to the old AD FS URL, but this was only happening via the reverse proxy.
Confronted with this problem, I tried a number of things unsuccessfully:
- Reviewed everything in NETSH HTTP for possible changes.
- Double and triple-checked that all certificates were trusted by things that should trust them inside the infrastructure and on client machines.
- Un/re-installed the Web Application Proxy role.
- Deleted and re-created published applications.
- Turned off Windows Firewall (grasping at straws).
- Considered un-hardening my server in some manner (like I had to re-enable WinRM in order to remove the Web Application Proxy role, which got me thinking along these lines).
- Revoked all proxies in AD FS before un/re-installing.
- Tried to figure out why my Web Application Proxy server has a service called AD FS (which strangely, has a different Description than the AD FS server’s AD FS service).
AD FS server’s AD FS Service

Web Application Proxy’s AD FS Service

I’m finding this last bit particularly surprising. The Web Application Proxy is a Routing and Remote Access role that provisions a service called “Active Directory Federation Services”, which is the same name as the service that gets provisioned by the Active Directory Federation Services role, and they each have their own description.
At this point, I made sure to undo any of this crazy stuff and went back to the beginning. I had already reviewed the URL reservations in NETSH HTTP SHOW URLACL. I found the port/path reservations as on my AD FS server, plus my reverse-proxied URLs. Nothing here appeared to warrant a change. Similarly, when I reviewed NETSH HTTP SHOW SSLCERT, I found that my reverse-proxied URLs continued to use the same certificate they were using before, and my new AD FS URL was bound with my new certificate via the original Install-WebApplicationProxy change.
Having reviewed all of this, I inspected the Get-WebApplicationProxyConfiguration information and found that my ADFSUrl and OAuthAuthenticationUrl were still using the old URL. To be clear, I have updated all of the information that should control this in AD FS and I’ve completely un/re-installed the Web Application Proxy, but the Web Application Proxy configuration data that AD FS holds has never been updated through any of these changes, even after uninstalling and reinstalling it. In order to fix this, I had to update this configuration information on the Web Application Proxy server using the Set-WebApplicationProxyConfiguration cmdlet:
Set-WebApplicationProxyConfiguration -ADFSUrl “https://sts.sp2010.local/adfs/ls” -OAuthAuthenticationURL “https://sts.sp2010.local/adfs/oauth2/authorize“
Finally, after making this change, I could access my reverse-proxied Web Applications. And with that, I now understand both AD FS and the Web Application Proxy a bit better. The NETSH HTTP commands aren’t controlling much that is outside of what you would have done in IIS before, although it enforces SNI by default. And although the Web Application Proxy servers are effectively stateless, some of the configuration state never gets updated unless the update is forced from a Web Application Proxy server. All of this is new for an administrator (some of it may be familiar to developers) and very little of this behaviour is documented today, so hopefully this post will help someone else in a similar position.
Great article! Wren
Thanks yo!
Really helpful
Excellent article! I couldn’t figure out what was going on when I was getting no response from my server after changing the URL after looking EVERYWHERE, or so I thought
Hi, great article, below one improvement.
SSL binding can be added in such way:
– Run Set-AdfsSslCertificate -Thumbprint thumbprint_here
This command will add new entries for ports 443 and 49433 and update existing localhost binding.
Unfortunately you still need to remove the old binding manually:
netsh http delete sslcert hostnameport=sts..com:443
netsh http delete sslcert hostnameport=sts..com:49443
Thanks Adam, and sorry for the rather long delay responding. I lost track of this post-Xmas. I will update the article as you suggest. Not sure how I missed this cmdlet. I guess it’s a bit obscured by Set-AdfsCertificate http://technet.microsoft.com/en-us/library/dn479306.aspx
Hi Adam, thank you for this helpful article!
I think there is one slight inaccuracy when it comes to reregistering the http.sys listener for the device registration service: if you have a look at the listener on your screenshot, this one doesn’t have the “Ctl Store Name” defined but has the “Negotiate Client Certificate” enabled. So I think the following command should be used to reregister this one:
$hostnameport = “sts.sp2010.local:49443″
$Command = “http add sslcert hostnameport=$hostnameport certhash=$certhash appid={$guid} certstorename=MY clientcertnegotiation=enable”
$Command | netsh
Thanks,
Jay Dee
I think you’re right Jay Dee. Since this is the certificate authentication port that would make sense. I will make the change above. Thank you.
Another thing to watch for that took me over an hour to fix: Sometimes pasting in the Thumbprint to Install-WebApplicationPoxy does not work. When I finally grabbed the $cert object and passed in $cert.Thumbprint directly it worked. I was sure I had the correct thumbprint, I even verified with:
“MYTHUMPRINT” -eq $certs[11].Thumbprint which evaluated to true
but when I did this:
[String]::Equals(“MYTHUMBPRINT”,$certs[11].Thumbprint)
It evaluated to false!!!!!
that took forever, and I only stumbled upon the fix when I said to myself “what the hell, i’ll just try this”
I have no idea why, if you have ever heard of this I’d appreciate an explanation. Otherwise save this tip for the future.
I should add it was not a matter of case for the String.Equals() compare, (I actually copied and pasted the thumbprint and it still evaluated to false)
Hi Christopher. Thanks for the tip. I have hit similar issues but I haven’t found the cause. I’ve even typed in the thumbprint. I definitely prefer your approach of grabbing it from the cert’s thumbprint attribute, which is how I would choose to script this. For the purposes of this post I didn’t want to distract from the core message too much so I simply pasted it in, but I think you’re right it would be better to update that bit of script. I’ll do that when I get a chance. Cheers!
excellent post mate, many thanls
One question, where do you get the $certhash = “e1f71e1560fc00f8bee989ee6abbf07119bc7276″
from?
There are a lot of ways to find it but you could use Get-ADFSCertificate to find the thumbrpint of the new cert if it’s already there in AD FS, or there are cmdlets for pulling it from your personal store or you can just paste in the value as I did in this case (I tired to simplify this a bit but may have failed on this point). 🙂
Very Helpful
Can you modify the listening PORTS using this same method? For example change port 49443 to 8443?
I wouldn’t. Use Set-ADFSProperties -TlsClientPort
https://technet.microsoft.com/en-us/library/dn479342(v=wps.630).aspx
Great Article!! Helped me out.
Tanks a lot!
Hello,
How to acces at the commande Get-SPTrustedIdentityTokenIssuer ?
Thank you
Thank you! Very helpful!
Hi,
For the Web Application Proxy change, try setting the reg key
HKEY_LOCAL_MACHINE\Software\Microsoft\ADFS\ProxyConfigurationStatus to 1 instead of 2.
This will then force the Remote Access setup configuration to rerun from scratch so you can do all the changes via the GUI.
I only had Exchange reverse published but it seems to have done the trick.
Great article. I found it while searching for information on implementing wildcard certs in ADFS and WAP on Server 2016
Some of the powershell commands were good. In the end I didn’t need them, but may later in order to fix the following issue:
If your adfs server is adfs.contoso.com, and you import a wildcart cert of *.contoso.com into Adfs, then set the adfsSslCertificate, certauth.adfs.contoso.com immediately breaks.
This is due to the additional subdomain after “adfs”. The wildcard doesn’t cover another down level domain.
If you do a get-adfsSslCertificate, you’ll see certauth still bound to 443 on its original self signed certificate. 49443 is bound to the wildcard cert which I don’t think is right. I think it should be bound to certauth on 49443 with the self signed cert. I did not fix it as I’m not using it’s functions.
I’m assuming that we can adjust it with some of the commands from this article.
On the WAP server, certauth doesn’t even appear any longer.
Mark with the registry key really made the WAP process easier. I had so much trouble in an earlier attempt that I completely rebuilt WAP. This time it was clean, no powershell commands were needed.
Toggling the registry key does not impact your existing published applications.
Select your wildcard certificate, add your creds for admin access on the adfs server and done.
Thanks again for the article.
This was exactly the right resource for my own dilemma.
We have an F5 load balancer ahead of our ADFS 3.0 servers, but could never manage to get its health monitors to properly probe availability of the HTTPS service by IP address.
The solution is to use “ipport” as opposed to “hostnameport” in the examples above.
Here is the finished (and successful) command:
$guid = “5d89a20c-beab-4389-9447-324788eb944a”
$certhash = “bfd2e99a7652e7e80b9e5c5df46e7bcb4aa994d9”
$ipport = “10.164.11.235:443”
$Command = “http add sslcert ipport=$ipport certhash=$certhash appid={$guid} certstorename=MY sslctlstorename=AdfsTrustedDevices clientcertnegotiation=disable”
$Command | netsh
Tristan, thank you for the really useful info. Can you advise me on a related subject please?
I’ve had an ADFS server and WAP server working fine for many months now, but the ADFS server’s Managed Service Account was accidentally deleted from AD and even though it was restored, the ADFS server has never been the same, for example, I can’t renew the SSL certificate using Set-AdfsSslCertificate. It produces a load of errors which I believe are due to to the lack of authentication using the restored Managed Service Account. Published web apps are somehow still working fine, but I don’t want to restart the WAP servers in case they lose their current configuration (or whatever information they get from ADFS).
Do you know if I can blow away the ADFS server and rebuild it, then re-establish trust with the WAP server with minimal downtime?
Hi Andy. I don’t have anything concrete to suggest, although the WAP on-going functionality makes some sense since it only has an indirect dependency on AD FS. You should be able to restore the AD FS configuration if you have it backed up, but you may need to fiddle with the script to re-target the new account. I would also be looking at whether the SPN still exists, post- restore. Beyond that, you might want to seek assistance before introducing down-time. AD FS can be tricky if you don’t spend a lot of time with it.