Continuing this series about the SharePoint 2010 IRM implementation, in this post I’ll keep looking at the Work E-mail Address attribute in the User Information List, but focus specifically on how the initial value in that field gets populated from different sources for different Authentication Provider Types. As with the fuller picture considered in the last post, this is a lot more complicated than anyone would expect at a glance, but it’s really the lynchpin of this functionality – thus the depth here.
Posts in this Series
SharePoint 2010 On-Premises with AD RMS:
- Part 1 – Protecting SharePoint 2010 with Information Rights Management
- Part 2 – How SharePoint 2010 Finds and Updates a User’s Work E-mail Address
- Part 3 – How SharePoint 2010 Authentication Provider Types Alter the Initial Population of Work E-mail Values
- Part 4 – Inspecting an AD RMS Request from SharePoint 2010
- Part 5 – RMS Publishing Permissions for SharePoint 2010 Application Pool Identities
- Part 6 – RMS AD Caching for SharePoint 2010 Users
- Part 7 – RMS Use Licenses, Offline Access and Rights Revocation with SharePoint 2010
- Part 8 – SharePoint 2010 with AD RMS Process Diagram and Summary
Planned posts, covering newer versions and new twists:
- SharePoint 2010 with Windows Server 2012 AD RMS
- SharePoint 2013 with AD RMS
- SharePoint On-Premises with AADRM
- SharePoint Online with AD RMS
- SharePoint Online with AADRM
- SharePoint with RMS Trusts including ADFS
- Search, Rehydrated Users and RMS
Windows Authenticated Users
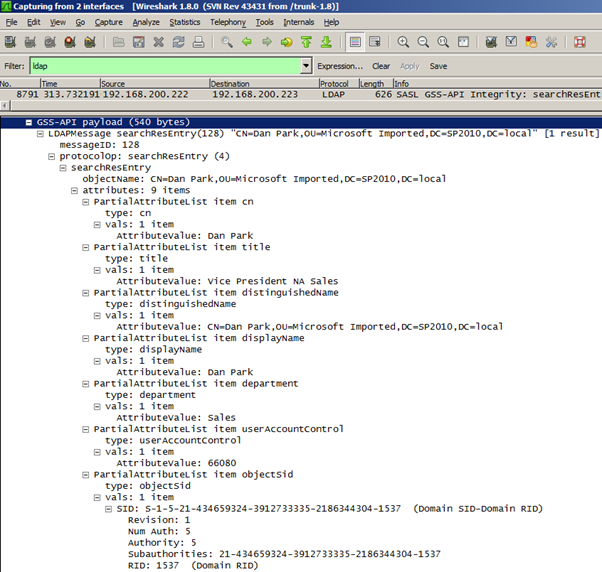
In the first scenario, we’ll consider how Classic and Claims-Based Windows-authenticated users get a Work E-mail address value in the User Information List, either when an individual user is added to a Site Collection (rather than as a member of a group) or when they log in to a site for the first time (after getting added by group). For these users, the RMS protection process should work reasonably seamlessly, assuming Active Directory is in sync with SharePoint and the user has a mail value in Active Directory. Keep in mind that this is not always the case. For instance, if the user doesn’t have an Exchange mailbox this value will have to have been populated manually or by some other process. But if all of this is in order then we can spot the Global Catalogue query (from the SharePoint WFE that’s serving the request) for the new user in a network trace.
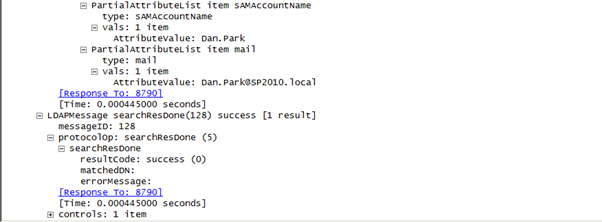
The SharePoint LDAP Query that requests attribute data for the User Information List*
* Digression: I’ve seen wildcard queries for a user as well (pulling back tons of attribute data) but I believe this set of nine attributes are the data that populate the User Information List. For whatever reason, more of these attributes are loaded in to the User Information List for Classic Windows users than for Claims-Based Windows users. The query and the results are the same in both cases but you can spot a lot more of the user data written to a Classic Windows user’s User Information List entry.
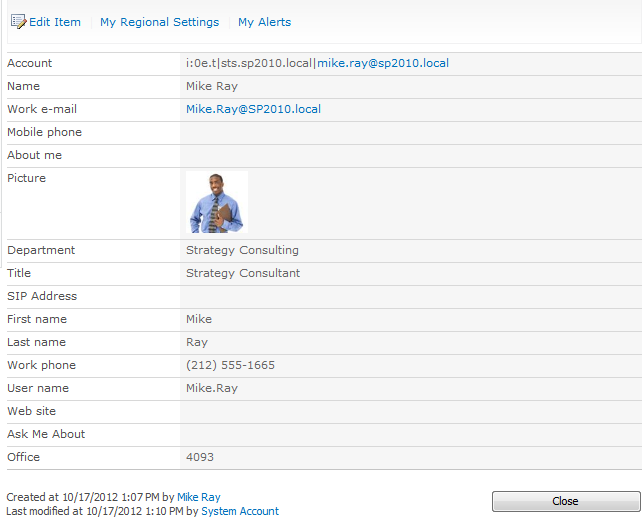
A User Information List page for a Classic Windows user who has not been targeted by the User Profile to SharePoint timer job

SAML Claims Users
For SAML Claims users, the story is more complicated. If you aren’t interested in that scenario, I suggest you skip down to the bottom of this article for a few words about FBA and multiple authentication providers.
-
The first important thing to know is that there is no corollary process to find Work E-mail Address when a user is granted access as an individual, rather than by some other Claim (irrespective of how the Identity Claim is configured). These users will not get a Work E-mail value when they are added to the Site. The User Information List entry is created for these users in the same way as for named Windows-authenticated users, but the Global Catalogue LDAP query never occurs (SharePoint doesn’t know if this user is an AD user behind the Claims) and the user hasn’t ever asserted an e-mail Claim for this resource (since they haven’t signed on yet). As a result, the Work E-mail field remains empty until the User Profile to SharePoint Synchronisation Timer Job runs (assuming the user is within the targeted scope of those jobs, as discussed in the last article). In short, the Timer Jobs become even more important than they normally are, so keep the -IgnoreIsActive switch in mind (as discussed in the last post).
-
Once a user is targeted by the jobs, everything looks pretty normal:
A User Information List page for a SAML Claims user who has been targeted by the User Profile to SharePoint timer job

- For users who are granted access by some other Claim, their User Information List entry will be created when they first access the Site Collection, in the same way that this happens for Windows Authenticated users who are added by group. For these users, the Work E-mail value will be populated from their E-mail Claim, assuming there is an E-mail Claim Mapping and that they are asserting it. If not, the Work E-mail field in the User Information List will remain empty until the user is targeted by the User Profile to SharePoint Synchronisation Timer Jobs, as above.
-
Note: one effect of adding this E-mail Claims Mapping is that it becomes pickable in the People Picker, which may be undesirable – although chances are in this configuration a custom people picker would be used instead.
- If a custom people picker is being used, it may be desirable to conceal this Claim from that picker.
- Keep in mind that e-mail addresses can be considered to be quite sensitive in some organisations/regions/contexts.
SAML Claims User Profile Synchronisation Connection Requirements
What all this means is that we really need user information updates from the User Profile Service in order to reliably provide access to RMS-protected content for SAML Claims users. This next set of information is more relevant to SAML Claims in general that just for RMS, but is nevertheless required to successfully synchronise the mail attribute from Active Directory to the User Profile service.
The SharePoint 2010 (and 2013) User Profile Synchronisation Services both have a dependency on the Authentication Provider in Connection Settings. This has been best described by Steve Peschka for SharePoint 2013, but applies equally to SharePoint 2010. These steps need to be followed precisely. In short, the User Profile Synchronisation Connection must be set up properly for SAML Claims users.
- The User Profile Synchronisation Connection must have been created selecting the correct Trusted Identity Provider. I’m unaware of any way to edit this later. Many things will not work with SAML Claims if this isn’t done because SharePoint won’t be able to associate a User Profile with a user’s Identity Claim.
- The Claims User Identifier Profile Property Mapping needs to be configured to import from the same attribute as the Identity Claim. This may or may not be the E-mail Address Claim Mapping I’m talking about above.
- Users must have been successfully imported with this configuration in-place already.
If these steps have not been carried out then the Timer Jobs aren’t going to push User Profile E-mail Addresses to Work E-mail Addresses in the User Information Lists, so any SAML Claims users who have been granted access as an individual (rather than by some other Claim) will not be able to access RMS-protected content, since the Work E-mail field will remain empty.
FBA Claims Users
While I’ve not spent any time properly investigating RMS support for FBA Claims users, I believe the scenario is largely similar to how it works for SAML Claims users, as described above. Certainly we’re assuming there is an AD user behind the FBA user, and the User Profile to SharePoint Synchronisation Timer Jobs are likely to play a key role, as above. The one thing I’m not clear about is how/if a Work E-mail value would ever get assigned before the User Profile to SharePoint synchronisation process occurs, presumably from an FBA role. I may revisit this later and provide an update here if time permits.
Multiple Authentication Providers
I’ve also not looked at how any of this works with multiple Authentication Providers on a single zone. I’m guessing this would work as it does above, based on how that user signs in or the provider where they’ve been picked from (if added as an individual). In either case, I can’t understand how this would vary significantly, since the user is bound to the Authentication Provider, but at this point I can’t offer anything more interesting than reasoned speculation.
In the next post in this series, I’ll tie all of this together by looking at an end-to-end request for AD RMS-protected content from SharePoint 2010.

